Tuesday, October 29, 2013

How To Fold A Towel

Okay...I know the title sounds weird. I know y'all know how to fold a towel, but I discovered a new way to fold them without any of the raw edges showing and I thought I'd share it. I saw this on a British tv show several years ago. I loved it and immediately went into all my linen closets and refolded all my towels! LOL! 

When I showed this to some friends of mine, a couple of them were asking what a "raw edge" was. Well, it's just when you can see the edge of the towel without it being folded under. Does that make sense? 

Here'a a picture of a towel folded the new way with no raw edges showing:


folding a towel


And here's a pic of a towel folded WITH the raw edges showing...


See the difference? I think it looks so much better without the "raw edges." :)

Here's a little tutorial of how to fold your towels all pretty with no raw edges. 


First, just lay your towel out flat with the tag side facing up.


Then just fold the top half down to the middle.

Then fold the bottom half up to the middle.

Then fold the right side over to the middle.

Then fold the left side over to the middle.
Then just fold the left side over on top of the right side and you're done!


Ta da!


I know this was a really dorky post, but maybe one or two of you will enjoy it. :) Happy folding!

~Lisa

I'm joining this party: We Are That FamilyImparting Grace


Friday, October 25, 2013

A New Kitchen Light

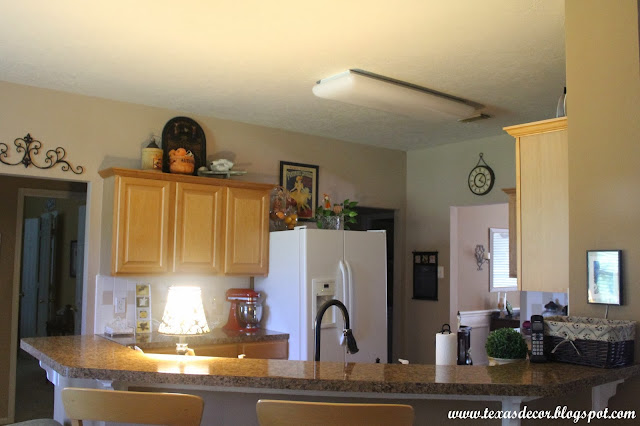
I wanted to share some pics of our new kitchen light. We finally replaced the old fluorescent light in our kitchen with this new one from Lamps Plus.


Now that I've shown you the new pretty one, let me show you what we started out with...


This was the standard fluorescent light that came with the house. It was really harsh lighting and it made a little buzzing sound when you turned it on. 

Here's one more "before" pic:


I looked for months (possibly years) for the perfect lighting solution. Every single one I liked was a pendant type light that hung down too far. They would have been perfect for over an island, but we needed to walk under it, so it had to be a flush mount, or a semi flush mount. 

One day I just happened to check the Lamps Plus website. They were having a really good sale and I found this one for half off. We ended up getting it for $100. It was exactly what I had been searching for. :) 

Here are some pics from when we were installing it.
This is what it looked like when we removed the old light. We weren't sure what we were going to find, but thankfully there were just two holes instead of one big one. 


Here's what my hubby used to patch the holes.


He just put the self adhesive patch up there and then used drywall compound that had been thinned a little bit with water. 


After it dried, we primed over it, then painted it. I'm so thankful we still had the original ceiling paint. :)


And here are a few more "afters"...


Here's a close up. I really love this new light. You can't tell at all where we patched the holes. Hubby did a great job!


Well, thanks for stopping by! Hope y'all have a wonderful weekend!!

~Lisa


Tuesday, October 22, 2013

Instagram Pics and Daily Life

Hi y'all! I thought I'd share a few Instagram pics today. (you can follow me @texasdecor) I know I don't get really personal on the blog, but for some reason, I tend to get a little more personal on Instagram. I don't know why that is...maybe because Instagram is so instant that I don't take the time to fret over each and every picture. I kind of just take a pic and post it. I love how easy and quick it is.  I know everyone isn't on Instagram, so from time to time, I like to share what I've posted about. :)

So here's a little of my life lately in Instagram pics:

Yep, this is me. :) I got these earrings at Charming Charlie. I love them! They came in a set with a matching necklace for around $10. They remind me of the ball that drops on New Years Eve.


I love, love, love these huggable hangers! Target has them on sale right now. You get a 10 pack for $7. They're covered with a velvety material and it really keeps your clothes from falling off the hangers. My shirts were always falling off and the collars were always getting stretched out on plastic hangers, so I switched to these and I absolutely love them. I'll never buy another kind of hanger again. :)


We started this little project this weekend. I'll blog about it when it's complete, but let me just say those pavers weigh 17.5 lbs. each and boy, were we sore the next day after installing them. 

This is what started the whole patio makeover...I ordered this Navarre rug (in green) from Ballard Designs. It was originally $89 on sale for $49, and they sent me a 15% off coupon, so I got it for only $42! They still have some great sales going on if you're interested. 


Someone celebrated her first birthday...


We recently cleaned out our garage (we're still in the process of organizing it) and I found my old Barbie case (circa 1976) with a few of my Barbies inside. :) My mom had given it to me when she moved from my childhood home years ago, but I just stuck it on a shelf in my garage and never even opened it until now. 
barbie doll trunk

Here's my Bionic Woman. See the bionic components in her right arm? 
jamie summers doll

This was an interesting one...her hair could be blonde or brunette with a simple twist of her scalp. LOL!

Looks like Jamie Summers might have a broken ankle. :)

I can't believe I still had all these clothes and accessories. Notice how the yellow purse still has the fake money inside. Ha!

I found these thin long sleeve shirts at Walmart the other day. I love a thin long sleeve shirt. It just doesn't get cold enough here for heavy sweater-like material. These were only $10. 


Well, that's about it for now. Thanks for going down memory lane with me. :) Hope this week brings wonderful things to you!
~Lisa

Friday, October 18, 2013

Making The Shower Door Like New Again and A Few Other Tips

Our shower door had gotten really bad with all the hard water we have here. I've tried every tip on the internet to clean it, and it still looked all streaky. It's almost as if the hard water kind of etched the glass. I thought I'd try a really inexpensive way to cover it up. 

Here's a "before" pic. You can see how streaky the glass was. 


I simply used $1 a roll clear contact paper from Dollar Tree. It says "clear" but thankfully it's a little hazy which is exactly the look I was going for.

Below is a pic of exactly what we used. We used four rolls to cover the door, side light, and the glass between the shower and the tub. First we wet the glass with a spray bottle filled with plain water, then cut the contact paper to size, removed the backing, and slapped it up there. You can move it around a little bit after you put it on the glass. Then we just smoothed out the bubbles with a credit card.


contact paper from dollar tree

Here's the "after" pic. I'm very happy with how it turned out and its held up great! A pretty good solution for only $4. :)


I bought some new cleaning rags the other day. I know this is going to sound weird, but I love to get new cleaning supplies! I really needed new cleaning rags and was so happy to see Target still carries these in the pic below. Always use white rags to clean with, otherwise, the color of the rag might transfer to the item you're trying to clean. I found this out the hard way when I used a pink washcloth to scrub a spot on my carpet years ago. It left a pink spot on the carpet. It was actually a very old pink washcloth and had been washed a zillion times, but it still left a pink hue on the carpet.


Here's another tip for you. We've never paid to have our house exterminated. We just always use this stuff from Walmart. It's about $6. I just squirt a little every couple of feet or so along the baseboards and also behind the stove, fridge, etc. I only use it about 3 times a year, so this jug lasts a long time. It's non-staining and doesn't have an odor either. Love that! It's for indoor and outdoor use, so I also use it around the doors and windows outside. 


Below is a close up of the label.


I almost forgot...this is a towel rack my hubby made for our bathroom. 


Here's a close up. He just routered a piece of wood and I primed and painted it oil rubbed bronze. Then he attached the hooks and we covered the screw holes up with these cute wooden fleur de lis. (they're just hot glued on) I painted the fleur de lis with watered down brown acrylic paint. 


fleur de lis towel rack

Here's one more tip for you. I was watching The Food Network the other day and they were talking about a way to "quick soak" your beans. Instead of letting beans soak overnight, you can just put them in a pot and pour boiling water over them and let them sit for one hour. This is supposed to be equal to letting them soak overnight. Have any of you ever tried this? Am I the last one to hear about this? Sounds like it would work. 

~Lisa


Tuesday, October 15, 2013

More Fall Changes

So, y'all didn't think I'd leave my Fall decor the same until Thanksgiving, did you? :) Shortly after I took my "Fall Decor" pics, I switched things up again. 

Here's my dough bowl that I brought back out on the kitchen table. I decided to decorate her for Fall. And yes...it's a "she." :)


Here's what I had on the table before. It's the same thing I have on my dining room table. I liked the hurricane glass with the candle, but I wanted something different in the kitchen.


I really missed having my dough bowl on the table, so I brought it back out. Here, I'm deciding which fall ribbon to use. 


Here are a few more pics. I just added some pine cones, fall ribbon curls, and the pumpkins that were already on the table.


I'm so much happier with the dough bowl back on the table. I really missed her. :)

I also made a few changes to a wire pumpkin that was on the buffet in my kitchen. Here's a before pic:


I got the pumpkin at Hob Lob a few years ago and it has always bothered me that it was such a dark color. It kind of blended right in with my dark brown buffet.

I just taped off the leaves and painted it Heirloom White. 


Here are a few "after" pics.


These pumpkins came in a bag (there were 7 of them) at HEB for only $4.99!


I think the white looks much better. You can really see the pumpkin now. 

I also painted a candle holder that was in my bedroom. Here's a before pic:


Again, this just really blended in with my table. BTW...this is a cell phone pic, so it's not great and I don't know why it looks like my table is covered in dust. I promise it's not that dusty. :)

Here it is after I painted on some watered down white acrylic paint. Again with the "dusty look." Don't know what's causing that. Sorry. :)


Now you can see it a lot better. Well, I guess that's it for now. Thanks for stopping by and check back Friday when I'll share how we made our streaky shower door like new again for only $4. :)

~Lisa

I'm joining these parties: Common Ground

Related Posts Plugin for WordPress, Blogger...