This post has been a long time coming. Through the years, I've had several requests to do a big post on how I designed our backyard landscaping.
I'd never designed anything like this before, so it was kind of a "fly by the seat of my pants" project. But I think it turned out okay. :)
Above is Vitex...one of my star bloomers.
Before we get started, let me show you how it all began. Below is a pic of how our backyard looked right after we built this house. It's the exact same spot as the above pic.
You can see an entire post about our before and after backyard HERE. When they installed our grass, we had already outlined the above area with landscaping timbers and we told them not to put any grass squares inside that area. So much easier than having to remove all that grass later, not to mention the money that we would have wasted.
At the time, we had a six year old and a one year old, so it was all about the boys and their play spaces. I wanted them to have a fun, safe place to play, along with a big grassy area for football, baseball, etc.
As I mentioned, we cornered off that one section of the yard and outlined it with landscaping timbers. Then we lined it with weed guard, filled it with playground mulch, and added lots of fun things like a swing set, fort, log cabin, pirate ship, slides, and numerous riding toys.
The boys loved it! It was perfect for that time in our lives and we enjoyed many, many years with it that way.
Then, as the boys outgrew the playset, and became more interested in things like iPhones and iPads, we decided to dismantle everything and design a more grown up backyard.
But don't worry, we saved a lot of the wood from the playset and my hubby made these adirondack chairs, bench, and bridge from them. So fun to still have a little of the playset with us. :)
I still wanted a big open space in the middle for the boys to have football games, etc. so that was our first goal...to have plenty of "running space" left in the middle and just landscape around the perimeter.
I literally sat down on the patio with a pencil and paper and sketched out what I wanted the yard to look like. I knew I wanted a lot of evergreen plants, so it would still look pretty in the winter. No one wants a completely brown garden all winter long, right?
I also started researching local plants/flowers that were native to our area. I started with my favorite garden book...
You can probably find a local garden book for your area too. A quick Google search will lead you in the right direction. This book has been invaluable. I refer to it all the time. Oh, and it helps that my mom is a certified Master Gardener. ;)
I'm constantly drawing inspiration from all over, such as this pic I took while visiting the Winchester House in San Jose, California...
I love the crescent moon in the garden!
So, back to the evergreens. There are lots of evergreens that also provide a little color, which I love. Nandinas are a perfect example of this. They have a lot of yellow and orange leaves along with pretty red berries in the winter...
Here is the nandina with the pretty berries...

I also love Chinese fringe (AKA razzleberry bush, AKA loropetulum)...
Loropetulum on the left, nandina on the right.
It's purple in the winter, then turns a pretty green in the summer. In the pics above and below, you can see it still has a lot of its purple color from the winter.
Chinese fringe delights with pretty blooms several times a year too, which is always a welcome sight...
Liriope is a staple for many gardens. It's an evergreen and is available in lots of varieties such as this variegated one we have...
I should pause here to suggest you research what plants are poisonous, especially if you have little ones or pets. Some of the most common plants are poisonous, so be careful in the selection process.
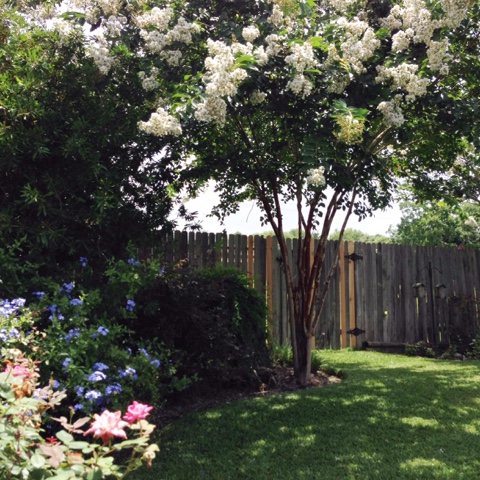
So, as I sat out there with my sketchpad, I thought about how I wanted to be able to see pretty blooming crepe myrtles from my kitchen window. So, I literally went inside, sat at my kitchen table, and looked out the window to see exactly where those crepes should be planted and added them to the sketch.
In the pic below, you can see a wide shot of the crepe myrtles, although they weren't blooming at the time.

And here's one where they're in bloom...
Here's a close up of the white crepe in full bloom...
And the pink ones...

I also knew I wanted lots of curves in my borders. It adds a lot of interest to your garden. You can use cans of spray paint to outline your beds before removing the grass. And be sure to add a lot more mulch than you think you'll need. It kind of washes away after awhile, so you'll be glad you added extra. We also add in a little peat moss with the mulch.
I love curvy lines in flower beds.
I've mentioned this before, but it bears repeating. This is my favorite weed prevention product...
You have to pull any existing weeds first, then sprinkle it on top of the mulch and it'll keep your beds weed free for about three months. Try not to walk on the mulch or dig in it after applying Preen because if it's disturbed in any way, it won't work. Also, never apply Preen to your grass...it'll kill it. Read the directions carefully.
Another important thing to consider is which areas have full sun vs. shade, etc. I knew the back fence got full sun all day long, so that's where I planned for lots of sun loving varieties like crepe myrtles and roses.
The opposite side of the yard gets shade almost all day long, so that was a perfect spot for shade loving things like azaleas and begonias.
We're lucky that in our climate, there are a few things that do well in shade and sun like nandinas, juniper, liriope, boxwoods, and indian hawthorn to name a few. So you'll find these all over our yard, regardless of sun or shade. All the above mentioned shrubs are also evergreens.
Another thing to consider is how big your plants will get so you can leave ample room between them. This is a hard one for me because I always want to squish everything together so there's no blank space, but I'm learning. Gardening is definitely a learning process, as well as an ever changing one. I'm constantly moving things around, pulling things up, and adding in new ones, trying to find what works best in our climate.
We have a big bald cypress tree in our backyard and it's grown very fast. When it was first planted, there was still a lot of sun around it, so we could plant sun loving things there. But as it's grown, it now shades that whole area of the yard, so we've had to switch to shade loving varieties. Just another thing to consider if you have trees.
The bald cypress is deciduous, so it loses its leaves in the winter, so we need to plant things under it that can take the mild winter sun, as well as shade in the summer. Lots to think about, I know. :)
We were very adamant about having several seating areas in our backyard, so we planned for that as well. Since the aforementioned tree provided lots of shade in the summer, that was the obvious place to start.
We also have this seating area on the patio..
My hubby really wanted several water features in the yard, so we left room for those too. Be sure to figure out how to get the cord to an electrical outlet if you have a running fountain. (We buried the cord underground.)
I couldn't let this post end without a pic of another one of my star bloomers, the bottle brush tree...

Bottle brush tree with blue plumbago in front.
For us, having a relatively low maintenance yard was key to being able to enjoy it vs. spending a lot of time on upkeep. We've now gone down to only one rose bush because the spring pruning was too time consuming. I guess one of my biggest tips is to pick plants that are native to your area, pay attention to their needs (sun, shade, etc.) and remember you can always add year round color with annuals. I always try to add in a few colorful annuals in the winter when some things (like the grass) have gone dormant.
Our patio with winter annuals...
And with spring annuals...
And last but not least, we added in a few fun pieces to the yard like this fire hydrant my hubby painted for me...
He's a fireman and picked up this old hydrant before it was thrown away.
A few more fun pieces...
Just because it's an outdoor space, doesn't mean you can't still decorate. :) I think I've touched on almost everything, but if you have any questions, feel free to ask in the comments.
Y'all have a great day!
Joining Thoughts of Home on Thursday
~Lisa