Saturday, June 29, 2013

A Chalkboard Makeover

I bought this chalkboard at Garden Ridge a few years ago. At first I liked the fat little chefs, but over time, I got tired of them. 

These were taken before blogging, and obviously it was around Thanksgiving. :) 

chalkboard make over tutorial
All I did was buy three different pieces of scrapbook paper, cut it to size and then I just used double stick tape to attach it right on top of the little chefs. 

Easy peasy! You could even switch out the paper for different holidays. 

Such a simple update. I really liked having this chalkboard in the kitchen and I'm glad I could continue using it.

Edited to add: I recently did another makeover for this chalkboard and you can see it HERE


One quick note...Do y'all remember my FAVORITE THINGS post? Well, I've been working on a Favorite Things Part Two and hope to get it posted next week, so be sure to check back for that. I have some fun summer items, beauty products, and even a baking item that I think you'll really like. :)

Hope you all have a great day!

~Lisa

I'm joining these parties: Amaze Me MondaySunday Showcase PartyInspire Me TuesdayTuesdays At Our HomeWow Us WednesdayWorks For Me WednesdayHomework WednesdayCreate It ThursdayGrace At HomeFlaunt It FridayWeekend Wrap-Up PartyFriday Flair, Sundae Scoop


Thursday, June 27, 2013

4th of July Decor

I thought I better show my 4th of July decor before I take it all down. I really don't have much, just a few things here and there. I was just thinking the next time I show holiday decor, it'll probably be my Fall decorations!! Wow, it'll be here before we know it! :) To view more of these rooms, click on  "Home Tour" under the labels on the right side of my blog. All pics enlarge when clicked.

Remember the burlap bee candle holder I recently got at Tuesday Morning? I just stuck some newspaper in it to hold these picks I got at Hob Lob.

Here's the entire hutch in the kitchen. 

I  hung this little metal sign on this basket.

Another little star I got at Hob Lob.

I got these little guys at Dollar Tree a few years ago.

Love this little patriotic cupcake. There's actually a really good smelling candle inside.

Here's a wider shot of that tray. I had to include my mixer since it's got the patriotic thing going on too with it's red color. :)

I also got these stars from Hob Lob.

I don't know why, but these are probably my favorite 4th of July decorations. 
  
Some dish towels my mom got for me. Thanks, mom!

The little star was another Hob Lob find a few years ago. I love to hang things on this lamp in the kitchen for all the different holidays. I should have replaced the gumballs with some red, white, and blue m&m's or something like that. :)

Once again, Hob Lob.
  
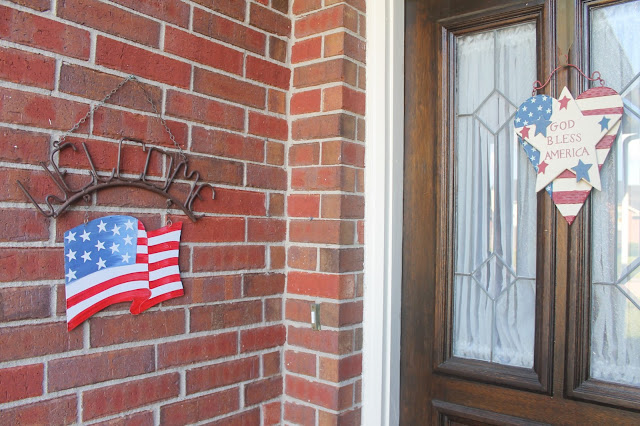
flag welcome sign
I'm so glad I decided to hang my welcome sign out again. I had it stored for several years. It came with tons of different signs to hang from it. I think there are signs for every holiday including birthdays. I've definitely gotten my money's worth out of it. :) 

I stuck a little flag in my pot of red geraniums.

And another one in with my angelonia.
That's it for Independence Day decor! Check back later in the week for a simple chalkboard makeover I did for my kitchen. :) Enjoy your day!

Sunday, June 23, 2013

Custom Frame for Pets

So, y'all know how much we love our little Holly cat. She is the sweetest cat ever. :) I wanted to hang a frame with her picture in it above her food bowls. I couldn't find what I was looking for at any of the stores, so I made my own. I already posted this on Instagram (you can follow me @texasdecor) but I wanted to share it here too. This project was super simple and super cheap. :) This isn't the best tutorial, because I kept forgetting to take pics, but it's pretty self explanatory. 

First I'll show you the finished product. I love how it turned out!

Here's what I used.

1. Mod Podge with a foam brush~already had on hand
2. Wooden Frame from Michael's~$1
3. Leopard and Cat print scrap paper from JoAnn's~I think these were .25 cents each. 
4. Alphabet stickers from JoAnn's~$1.99
5. "Cat" stickers from JoAnn's $1.99
6. Command poster hanging strips~already had on hand.

I only spent about $5.50. What a deal!

I loved this paper. We had to get the leopard print one because we affectionately call Holly "little leopard belly" because her belly has spots that look like, well, a leopard. :)

These were so cute. Love the fish!

Here's my helper. :)

First I just cut little squares of the leopard paper and mod podged them to the corners of the frame.

I traced around the cardboard that was in the frame. This was going to be the background behind Holly's pic .

I used this glass to trace around her pic.

Basically, I just set the cat scrap paper on top of the cardboard that was in the frame. (there wasn't any glass) then I taped Holly's picture on top of the cat scrap paper. (I wanted to be able to easily change it out) I just stuck the alphabet stickers in her name to the top, then added some fish, hearts and paw print stickers around the edges and the "kitty" "purrrr" and "meow" stickers at the bottom. Easy peasy!

Now she can dine in style. LOL!


Here are the picture hanging strips I used. You can even cut these in half if you're not hanging anything heavy. It basically holds it up with velcro and doesn't leave any holes in the wall.

I had to share this too. My aunt gave me this magnet of paw prints that spells out "Holly." I love it! I have it on the fridge where we can see and enjoy it. :) And yes, that's a "Vulcan" magnet from Birmingham to the left. My mom brought it back for me. :) I first heard of Vulcan while reading the Southern Sisters Mystery Books I talked about HERE. Such good books!!

I mentioned earlier that Holly was scheduled to get spayed and microchipped on Friday. Well...our sweet vet got sick and cancelled on us, so she lucked out! Ha! We'll have to re-schedule for another day.

To see my post on a few kitten products we've been using and a few "new kitten tips," click HERE

Well, that's all for now. Enjoy your day!

~Lisa

Saturday, June 22, 2013

Cotton Candy "Ice Cream" Cones~Party Favor Idea

I was recently at a birthday party and these were the favors. 

Aren't they cute?! I thought it was a perfect idea! In fact, I loved it so much, I came home and made these myself. :) My hubby and sons weren't impressed. They were like "who are these for?" and I was all "they're just for us!" and they were all "but why?" and I was all "because I'm in a house with all boys and sometimes I just want to make something girly, so is that alright with you?!" Then I had to calm down and chant "Serenity Now..." Just kidding! I think we make a Seinfeld reference almost daily around here. LOL!

Seriously, how cute are these? I love the pink one. 

I just stuffed some cotton candy in a waffle ice cream cone, put it in a cellophane bag, and tied it up with some ribbon. 

I thought this ribbon would be perfect for a 4th of July celebration.

Does anyone else live in an all boys household? Do you sometimes just have to make girly things even when you don't have a daughter? I know I do. :)

~Lisa

Thursday, June 20, 2013

Michael's Competitor Coupons

Just had to let y'all know this in case you're going to Michael's this weekend. Did y'all know Michael's accepts Hobby Lobby and Joann's coupons??? I didn't. I was at Michael's today buying some washi tape (they had a large selection on clearance for $1.99, by the way) and a few other things, and I didn't have any coupons with me or on my phone, so I just happened to ask if they took competitors coupons and they said yes!! My Michael's only accepts Hobby Lobby and Joann's coupons, so I don't know if it's the same everywhere, but it wouldn't hurt to ask. :) I had a Joann's coupon on my phone for 30% off my entire regular priced purchase and they let me use it! Sweet!

Am I the last one to know about this? Probably. :) We're taking Holly cat to get spayed and microchipped tomorrow, so I'll be busy taking care of her, but I'll probably post some pics on Instagram. So excited Instagram has videos now! 

One more thing...I recently made Holly a cute little custom frame to hang above her food and water bowls. Hopefully I'll get that post up this weekend. It was a really inexpensive and fun project. :)

Y'all have a great weekend!!

Wednesday, June 19, 2013

Butterfinger Cake Recipe

Just popping in real quick to share a recipe. I posted a pic of this cake on Instagram (chels70) and promised I'd post the recipe. It is the easiest cake to make and it's delicious! I didn't take too many pics while making it, but I did take an "after" shot of the completed cake and I have a few notes at the end of this post on some tips for this recipe. 

Here's the link to the original recipe: Butterfinger Cake Recipe from Kelly's Korner Blog While you're there, be sure to check out some of her other recipes too.

Here's the basic recipe: (with a few adjustments I made)

*One yellow cake mix
*One can sweetened condensed milk
*One bottle caramel syrup (15 oz.)
*Four full size Butterfinger bars (or 12 fun size)
*12 oz. Cool Whip, thawed

Basically, you just bake the cake as directed, and let it cool. Then poke holes all over the cake. Mix together sweetened condensed milk and caramel syrup and pour over cake, letting it seep into all the holes. Crush up Butterfingers and sprinkle on top of cake. Allow cake to fully cool, then top with Cool Whip.


Just look at all that goodness!
When you cut into it, all the gooey loveliness seeps out. I love the combination of Sweetened Condensed Milk and Caramel Syrup!


The original recipe calls for "caramel topping" but this is what I use. I've found that using the "syrup" kind works much better for me. I don't think the "topping" kind in a jar would work very well. It's too thick.
 Just a couple of quick notes:

* I let the cake cool for 15 minutes before poking holes in it. I also use the handle of a wooden spoon to poke the holes. You want a pretty big hole so the topping mixture has somewhere to seep into.

*I use a whisk to mix the sweetened condensed milk and caramel syrup.

* I also use 12 of the "fun size" Butterfinger bars. My grocery store has them in a six pack for $1. I unwrap them and put them in a gallon ziplock bag and crush them with the flat side of my meat tenderizer.

* Be sure to store this cake in the fridge. :)

I hope you try this recipe. I made it this weekend and my family raved over it! 

Here's the pic I posted on Instagram. This is what the cake looks like right before you frost it. Just look at all those yummy Butterfinger pieces!

~Lisa


Sunday, June 16, 2013

Hiding Those Cords!

I really hate cords. I'm always trying to hide them. My son's room has a little shelf with his tv on it and there were a ton of cords running down behind the shelves. I found a neat way to hide them. :) 
Can you tell what I did? 

It's just a piece of fabric the same color as the wall! We just stapled it to the back part of the shelves and routed the wires behind it. 

We tethered the shelves to the wall (remember I have boys-ha!) so I couldn't turn it around to fully show you what we did. We cut a hole in the fabric so we could still attach it to the wall. :)

You can kind of see it better in this pic. I really lucked out and found fabric that closely matched the wall color. You could also get a patterned fabric. So many fabrics and patterns would work. Just use whatever you like. 

You can see how the cords are going up and over the top of the fabric here. 

Speaking of cords, this is how my lamp in the bathroom used to look. It's always bothered me that you can see the cord. 

Even when it's plugged in, it still showed too much for my liking. 

I solved this conundrum by simply placing a plate behind the lamp. 

Here's how it looks when unplugged.


Even when it's plugged in, it still hides most of the cord. :)
To see a full tour of the bathrooms, click HERE
Hopefully I gave you an idea or two today. Do y'all hate cords as much as I do? :)

~Lisa

I'm joining these parties: Amaze Me MondaySunday Showcase PartyInspire Me TuesdayTuesdays At Our HomeWow Us WednesdayWorks For Me WednesdayCreate It ThursdayGrace At HomeFlaunt It FridayHomework WednesdayWeekend Wrap-Up PartyFriday FlairSundae Scoop


Related Posts Plugin for WordPress, Blogger...