
We recently painted our kitchen cabinets white. You can see the reveal post with lots of pictures HERE. Since then, I've gotten lots of questions from people wanting to know exactly how we painted them. So today I'm doing a full tutorial with lots of pics. I'll show the products we used, how we did it, etc. I'll also share how we added the furniture feet to the bottom of the cabinets. I do want to say that this is what worked for us. It may not be the best way for everyone to do it, but we've been extremely happy with how ours turned out. :) If you follow me on Instagram (my Instagram name is texasdecor) you've already seen some of these pics and explanations. :)
Here's a couple of refresher pics of the finished, painted cabinets...


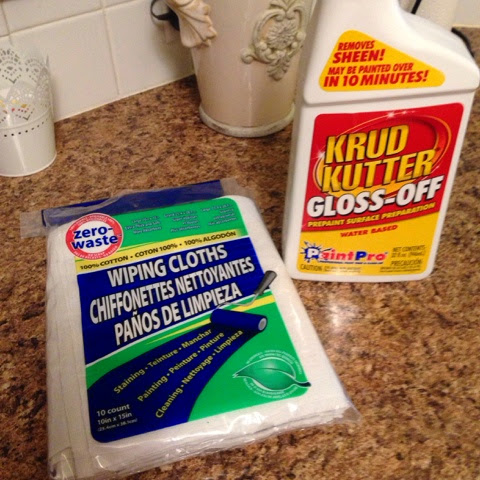
Okay, the first step was to clean our cabinets. We used Krud Kutter Gloss Off. It was a cleaner and deglosser in one. Our existing maple colored cabinets had a slight sheen to them, so this worked to dull them a little. You can also see the cloths we used to clean them in the pic below. After we cleaned them according to the directions on the bottle, we let them dry for a couple of hours, then started priming them. You don't have to let them dry that long, it just took us awhile to get everything ready to start priming.
I also took these pics of our cabinets with my phone and added the numbers to them in my "Beautiful Mess" App. (you can see the old, original maple color in these pics)
I also took these pics of our cabinets with my phone and added the numbers to them in my "Beautiful Mess" App. (you can see the old, original maple color in these pics)

I gave the cabinets numbers and gave the drawers letters. You always want to number everything, so you know where to put the cabinets back when you're done.

Then on the insides of the cabinets, I put the hardware to that particular door inside a ziplock bag with the assigned cabinet number in there too. Then I just set the hinges inside the cabinet.

On the actual cabinet itself, I wrote the corresponding number inside the hole where the hinges were. It would be covered up once the hinges were put back on. You can also see I put an arrow pointing to the top of the cabinet so we'd know which side was "up." :)

After we removed the drawer fronts, we just wrote directly on the front part which letter it was.

Then on the drawer front (that we removed) we wrote the corresponding letter. Again, we put a little arrow showing which side was "up."

Next up, it was time to prime them. We used one coat of Zinsser Bulls Eye 1-2-3 primer and let it dry for 24 hours before we put on the first coat of paint. We used 2 inch Purdy brand brushes to get into the grooves and regular paint rollers for the flat parts.

Here's a helpful hint. We used these painter's pyramids to prop the cabinets on while we primed/painted them. I think we bought 80 for this project. (they come in packs of 10) Each cabinet needed 4, so it was a lot.

You can see the painter's pyramids at work in the pic below. They worked like a charm! Holly says "This painting business is exhausting." :)

Here's what our living room looked like for about 4 days. We moved all our furniture into the foyer and dining room.

This pic is kind of blurry, but here's where I painted the drawers.

As far as I'm concerned, this is the MOST important part of the painting process...the paint! I would be willing to bet I spent about 15 hours online researching "how to paint kitchen cabinets." This Benjamin Moore Advance paint got great reviews, so we decided it would be the best choice for us. We got the color "simply white" in a satin finish and used two coats. (letting it dry 24 hours between each coat) I can't tell you how happy we've been with this paint!

In all the painting tutorials I read, everyone seemed to like the 4 inch foam rollers for painting cabinets. Well, as you can see in the pic below, this is what happened when we used them. It bubbled up and looked horrible. (We even let it dry on a spare cabinet and the bubbles never went away. It dried with those little bumps all over it.) This is why we DID NOT use foam rollers. I'm sure it was just something we were doing wrong, because others seemed to love the foam ones.

The pic below is right after we smoothed out the bubbles with a brush. (it was still wet when this pic was taken, but the paint levels out as it dries, so you can't see brush marks when it's fully dry) It was fine after that, but I didn't want to have to do that every time, so we just used brushes for the grooves and regular paint rollers (not the foam kind) for the flat parts.

Here's another tip...when you're figuring out how much paint you'll need, in addition to the cabinet doors (both sides) and frames, don't forget about the kick plates under the cabinets...

and the underside of the cabinets themselves. Those two things were the hardest to paint. We literally had to lie down on our sides on the floor to see what we were doing when painting the kick plates.

After we put two coats of the Advance paint on them, (letting them dry for 24 hours between each coat) they had to sit and "cure" for about 5 days before we could re-hang them. We just moved all the cabinets (with painters pyramids under them) into the dining room to cure.

After the cabinets went back up, we put new bumpers on them. (our old ones needed to be replaced) The ones we bought are in the pic below.

Here's another tip...we used a q-tip to put a dab of Vaseline on the bumpers so they wouldn't stick to the newly painted cabinets.

Y'all probably remember how we waited forever for the hardware to arrive. It was on back order (several times) and took several weeks to get here. Now I'm thinking maybe it was a blessing it took so long because we didn't have hardware on our old cabinets, so we had to drill new holes in them for the new pulls and knobs. Maybe it was better that we had to wait several weeks after painting to drill those holes? It might not have been a good idea to drill on the newly painted surfaces. I was just thinking it might have made the paint crack or something. I don't really know.
These are the best little things! They are templates for installing hardware on your cabinets and drawers. I think they were only about $2 or so and well worth it! My hubby said it made the installation process MUCH easier (and faster)
This is the one for cabinet doors...

These are the best little things! They are templates for installing hardware on your cabinets and drawers. I think they were only about $2 or so and well worth it! My hubby said it made the installation process MUCH easier (and faster)
This is the one for cabinet doors...
And this is the one for drawers...

Here's the hardware we got. The cup pulls are "Siro Designs 3 inch antique pewter Pennysavers" from Lowes. The item number is #424843. The cabinet knobs are from Home Depot and are "Richelieu 1 1/4 inch Pewter Knobs" Item #202700986
Here's the hardware we got. The cup pulls are "Siro Designs 3 inch antique pewter Pennysavers" from Lowes. The item number is #424843. The cabinet knobs are from Home Depot and are "Richelieu 1 1/4 inch Pewter Knobs" Item #202700986

You know, I never thought too much about putting hardware on the cabinets. We never had it on our old cabinets and I thought of it as mostly "decorative." But, after we spent so much time and effort painting them, it just made sense to put hardware on them to protect the paint job. I didn't want our (sometimes grimy) hands all over the fresh paint, messing it up. :) So, I guess cabinet hardware is decorative AND has a purpose. :)
Now, for the cabinet feet. Below is the tag on the ones we bought at Lowes. They're just 4 inch cabinet feet. They were $5.98 each. They come unfinished, so you can paint/stain them any color you want.

I primed them with the same primer we used for the cabinets and then painted them with the cabinet paint (Ben Moore Advance) so they would match perfectly. After we painted them, my hubby removed the screws. They were a tad too tall for the kitchen cabinets, so he shaved a little off the top to make them fit.

Then we just simply placed them under the cabinets and my hubby nailed them from the inside of the cabinet.
Then we just simply placed them under the cabinets and my hubby nailed them from the inside of the cabinet.

You can see he put about six nails in them. I don't think they're going anywhere. :)

And that's it, my friends! Here's a little collection of pics showing how the cabinets look with just paint...

Then with paint AND feet...

And finally, the finished product with paint, feet, AND hardware. :) I think the addition of the feet and hardware really do make a difference in how they look. We still need to replace the back splash with white subway tile, but that will probably be a few months down the road. :)

Oh my word, I think this is the longest post I've ever done! I hope this will help someone who's thinking of painting their cabinets. I say "go for it!" There wasn't anything hard about it, just time consuming, but SO worth it! Please don't hesitate to ask any questions. I know I asked plenty of questions when contemplating whether or not to paint mine. I'll do my best to answer anything you can think of. :)

Here are some very helpful links I used when painting my cabinets:
Evolution Of Style Blog and Dear Lillie
Thanks for visiting!
~Lisa
I'm joining these parties: Dwellings, Savvy Southern Style, Imparting Grace, Common Ground, I Should Be Mopping The Floor, Cupcakes and Crinoline, It's Overflowing, Maria Elena's Decor, A Stroll Thru Life, From My Front Porch To Yours, By Stephanie Lynn, Home Stories A to Z

Lisa, it all looks wonderful! I really love the hardware and the feet. When we moved into this house, we used those templates to put all our knobs on. I know some people don't like knobs and pulls but it really does extend the life of the finish on the cabinets if you use knobs. You two should be very proud of your work and the pretty outcome.
ReplyDeleteI used the same primer too when I painted my craft cabinet Lisa and instead of the roller (got the same results), I used paint brush as well! I have a lot of cabinets still to paint , laundry, basement kitchen, but I saw a nice sprayer Pam from Simple details used on hers and it looks divine too. We'll see what works best, the only thing I don't like about the paint brush is I could still see the streaks, must be the cheap brush I used, yours turned out great though!
ReplyDeleteIt was a train wreck---I thought---well, I have painted cabinets before- I will just skim through this post-lol...I read EVERY SINGLE word. I remembered reading this how much WORK painting cabinets can be! You did a wonderful, wonderful job, Lisa. They look like brand new. I love your hardware, too!;>) xo Diana
ReplyDeleteYou did a great job! It looks wonderful! Thank you so much for the detailed explanation. It really helps someone like me who has never done this before. I really like it when bloggers explain what they did step by step and the products they used. The hardware you picked out looks really nice also. I think it is so great that you and your husband work on the project together. That must be so fun even though it is a lot of hard work. You do a great job explaining things and taking photos. Thanks so much.
ReplyDeleteThank you, Kim! I'm glad you liked the tutorial. I know I always like to see lots of pics and detailed instructions, so I tried to include that in my tutorial as well. It actually is kind of fun doing all these projects together with my hubby. We work well as a team. :) Hope you have a wonderful weekend!
DeleteWow, so much work..but, so worth it :-) they look terrific!
ReplyDeleteHope your weekend is EXTRA BLESSED...
~Sherri
Thanks, Sherri! I'm really happy with them! :) Hope your weekend is extra blessed too!!
DeleteWow, you did a great job! I love you amazing organization skills. Love the little feet, thanks for sharing the journey with us, the results are just gorgeous!
ReplyDeleteHugs,
patti
Love the final result and I bet it was worth all the time too! I wish I knew about the painter pyramids when I was working on some paint projects. Thanks for the tip.
ReplyDeleteYour cabinets look beautiful, Lisa, and you did an amazing job on putting the tutorial together!
ReplyDeleteI know it took a long time to put together this post and I thank you! You shared some great tips that I found helpful. I never knew about the template for the cabinet hardware. I also never knew about the pyramids you can use for painting flat objects. I could've used those in the past! I also liked knowing which brand of paint you found to be the best. I love Benjamin Moore paints too. That's what we usually use. The addition of the feet to the cabinets was such a nice touch. It was good to get to see how that was done as well. Your kitchen looks great. I know you must be happy with the results.
ReplyDeleteOmy....this so reminds me of all the times we've painted kitchen cabinets....and I hated every single minute of it....but sure loved the results.
ReplyDeleteYour cabinets are just beautiful...such a fine job.
Thank you for taking the time to post all this. I want to repaint my cabinets & this white will be perfect. I have been told to only use a no-nap paint roller for painting flat surfaces for the best finish. I had used foam rollers before that. Your cabinets look great! Holly did not bother them drying on the floor?
ReplyDeleteThank you, Mary! That's a good tip on the rollers! I was amazed at how many choices there were at the paint store. We actually put Holly in my son's room while we were painting the cabinets. Then after the paint dried to the touch (in about an hour) we let her out, and of course she insisted on napping right next to the cabinets. Silly girl! For some weird reason, she loved walking on the tarps too. I think she liked the crinkly sound they made. :)
DeleteThe cabinets look great. Did you seal them after painting? I was told that if you do much cooking that you should seal them. I am thinking about painting my cherry cabinets but a fit afraid because of the trim.
ReplyDeleteHi there! No, we didn't seal them. Just primer and paint. The Advance paint dries rock hard, and handles scrubbing really well. You can scrub them just like you would unpainted cabinets. Good luck if you decide to paint yours! :)
DeleteThey look beautiful! I also used the Advance paint on the bookshelves in my office and loved it! I like how it feels smooth afterwards too. Sometimes when you paint, it can end up feeling sticky long after you are done but that paint is awesome! Great job!
ReplyDelete-Shelley
wow, these turned out gorgeous!! thanks for all the great tips, love Ben Moore paint. adding the feet makes such a big impact!
ReplyDeleteThanks, Debra! I love Ben Moore paint too! It was definitely the right choice for cabinets. Aren't those feet great? I'm so glad we added them. :)
DeleteWow - that is a beautiful change - and what a lot of work. We are in the process of buying an older house in town and many of the kitchens are perfectly adequate, but dated. With your tutorial, I'm sure I could make the changes I'd like.
ReplyDeleteGreat tutorial and your cabinets look amazing. Thanks tons for linking to Inspire Me.
ReplyDeleteYour cabinets look great! I had the same experience with one type of sponge roller, but there are more types out there. I found one for oil-based paint that didn't leave air bubbles. Love your tips about hardware, etc. :)
ReplyDeleteWhat an awesome tutorial, Lisa! This is exactly what I needed. Thank you so much for sharing at Tuesdays at Our Home. Hugs, Maria
ReplyDeleteIt looks gorgeous, Lisa! Awesome tutorial! Thank you bunches for linking up and partying with us!
ReplyDeleteThanks, Kristi! I'm so glad I remembered to take pics during the process so I could put this tutorial together. :)
DeleteThis is the best tutorial! Thank you for covering every little thing in so much detail. There's a lot that goes into this project, isn't there? But my goodness, look at the result! :)
ReplyDeleteSo happy for you. Thanks for linking this to Grace at Home--I'm going to feature this post!
Great tips, and so much work...but turned out beautifully!!! Looks great!
ReplyDeleteThanks so much for sharing at AMAZE ME MONDAY...
Blessings,
Cindy
Love your kitchen, and the cabinets turned out great! I wish you had posted this great tutorial two weeks ago!! It would have saved us the nightmare of spraying our cabinets!!!! Thanks for sharing!
ReplyDeleteThanks so much! At least we don't have to worry about painting cabinets again for a very long time. :) Have a great day!
DeleteSuch a detailed tutorial! I love your kitchen, Lisa! It's so brighter! Would love for you to come share it at our link party on my blog starting tomorrow morning (or even share your fabulous kitchen reveal please)! Hope you have a great week!
ReplyDeleteKendra @ www.joyinourhome.com
Thanks so much for the invite, Kendra!! I'd be happy to join your party tomorrow! Thanks for your sweet words on my kitchen too. :) I'm so happy with it!
DeleteLove your cabinets. What color on the walls are you using to natch those and the counter top.
ReplyDeleteThank you! The color on the walls is Kilim Beige by Sherwin Williams.
Deletethanks for sharing..Amazing stuff continues the good work.
ReplyDeleterta kitchen cabinets
I don't see any step about sanding, evidently with the cleaner and the primer that step can be skipped? thanks for any info on this
ReplyDeleteCorrect. We didn't sand at all.
DeleteBeautiful! How are things holding up now that it's been a few years? Friends of mine recently used the same products/process as you with great results, but they used 2 coats of primer. I just started my cabinets and have one coat of primer on, and the zinsser is already impressing me..would really like to avoid the second coat if your cabinets have held up well with just one!
ReplyDeleteThank you! It's been a little over 2 years now and they've held up great! For us, one coat of primer worked beautifully. I think the key is to let the primer dry for 24 hours before starting the paint. And also let the paint dry for 24 hours between each coat. We've spilled oil, grease, chocolate, cake mix, etc. on them and they've held up great while I scrubbed them clean. Good luck!
DeleteI really like your step by step tutoril for painting white kitchen cabinets. I am surprised how you put such a great effort not only on painting each cabinet but also taking picture of each step. Indeed you are a smart mentor. Alandawn @decorcrave.com
ReplyDeleteThank you for bringing more information to this topic for me. I’m truly grateful and really impressed. Please visit https://goo.gl/2VNh2G
ReplyDeleteDear supervision.
ReplyDeleteThe data of your blog is extremely good and attractive.
keep up the good work in your blog.
kitchen cabinets omaha ne
I really like the information provided in this article and I really like the way you have explained each and everything so well. Very well done with the article, hope that you will continue to do posting
ReplyDeletePoulin Design Center
Kitchen Cabinet Santa Fe
I absolutely LOVE the look of your kitchen cabinets. It's so gorgeous. You should be proud of yourself!!
ReplyDeleteDenver Kitchen Cabinets
Parker Kitchen Cabinets
Thanks so much for sharing. I get relavant information from your post.
ReplyDeleteAirless Spray
Lisa, This IS THE BEST Tutorial i've read on painting cabinets. period. I Feel like I should pay you!!! i just stumbled acriss your blog post on Pinterest. I've got the push I needed. All your tips, tricks and product recommendations were peefect. I'm painting a Sherwin Williams color that looks like a Wedgwood blue because I collect Wedgwood blue jasparware pottery. Im going to take lots of pics like you did. Blessings to you die on a born and bred Texan transplanted to Missouri! Jilly
ReplyDeleteOMG autocorrect, what, putting 'die on' in my post to this nice lady??? That was 'from'. Ugh!!!!
DeleteI'm so glad you liked my tutorial! I love the look of blue cabinets. You're going to do a fabulous job, I just know it! Good luck and let me know how it goes. :)
DeleteThank you for the detailed tutorial. Very impressively done and the task itself is even better! One thing I wonder though is if zinsser primer will do the same job for decking boards (skipping the sanding stage?).
ReplyDeleteWow! This tutorial is top notch! Maybe I’ll finally be able to convince my husband that we need to paint our very dark kitchen cabinets WHITE. Finally. Thank you for this! Side note: we are in the process of picking new flooring for our home and I love love love the look of your dining room floors! Did you guys replace them yourselves? If so, do you recall what you put down? Or if you have a post on this, even better! Thanks! Kammi
ReplyDeleteThis comment has been removed by the author.
ReplyDeleteDo you have any wood veneer on these cabinets? I have the same cabinets but I have wood veneer on the sides, I’m wondering if they would paint the same way??
ReplyDeleteI didn't see anything about sanding the cabinets before priming. Were you able to skip that step since you used the deglosser? Every other site I saw said to sand lightly to allow for the primer to stick. I am hoping to avoid that messy step.
ReplyDeleteThank you for the super detailed tutorial!! I am trying to decide whether to pay someone to paint ours or attempt it ourselves first. Can you give an update on how the paint is holding up? And we’re your cabinets solid wood? I really appreciate all the details and time you put into this post!
ReplyDeleteHi there! Your white cabinets look great! Did hour cabinets have wood grain (actual groves in the grain) before painting, if so did the paint level the grain or how did you get smooth cabinets? Also, did you sand between coats?
ReplyDeleteI bought the advance paint for my cabinets. They are flat. This paint had bubbles in it. When I rolled with the foam roller it left bubbles. I tried a regular roller, same thing. I’m bummed. I hope I don’t have to paint all my flat cabinets with a brush! Any suggestions? For this quality paint, I don’t think there should be a bubble issue.
ReplyDeleteI had the same experience using the Advance paint with the foam roller - hated it. Bubbles galore! Then I used the brush.. loved it, and you are right it levels out and you do not have to worry about brush marks.
ReplyDeleteGreat job on your kitchen, lov
e it
I like the knobs and pulls you used on the cabinets. Where did you purchase them, if you don't mind me asking? Thanks!
ReplyDelete