Remember when I showed you the metal artwork I recently bought? Well, today I thought I'd show you how my hubby transformed it for me. Here's a before pic:
I loved it, but I didn't think it was substantial enough for that big wall. I felt it needed a little something extra to take up more wall space.
I do love the chicken wire though!
I decided to have my hubby make a wooden frame for it. I wanted to paint the frame grey and then distress it a little.
Here's the frame he made. He just bought two 4 inch cedar fence pickets and one 6 inch fence picket. The were all in the clearance bin, so he only paid about $2 for all three.
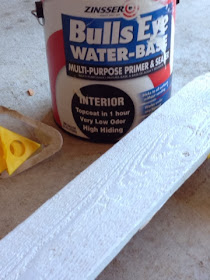
This is the primer I used. You can see I also used my PAINTER'S PYRAMIDS. :)
Here it is after I primed it.
And here's the finished product! I'm much happier with how much space it takes up now.
Here's a closer look.
I love how the paint turned out.
Here's another look at the whole thing. (I'll show you more of the whole wall/room with the big paint reveal post Friday) The frame is independent of the metal art. I wanted to keep them as two separate pieces in case I ever change my mind and want to use them separately.
And that's it! Thanks for stopping by!
~Lisa
I'm joining the party at: Common Ground and Savvy Southern Style
These are the paints I used. Valspar "cathedral stone" and a white acrylic paint in "snowflake." First I put a light coat of cathedral stone on with a regular paint brush. Then after that dried, I mixed the white acrylic paint with some water and applied it with a damp paper towel to give it a distressed look, especially around the corners.
And here's the finished product! I'm much happier with how much space it takes up now.
Here's a closer look.
I love how the paint turned out.
Here's another look at the whole thing. (I'll show you more of the whole wall/room with the big paint reveal post Friday) The frame is independent of the metal art. I wanted to keep them as two separate pieces in case I ever change my mind and want to use them separately.
And that's it! Thanks for stopping by!
~Lisa
I'm joining the party at: Common Ground and Savvy Southern Style


Great job, Lisa! I love the colors you used and the technique. Can't wait to see the rest!
ReplyDeletexo
Pat
That's gorgeous! What a great idea you two had.
ReplyDeleteWell, didn't that turn out cute? Love the color/finish of the piece. You are lucky you have a handy hubby! I do think it gives it a lot more ooomph now that it is bigger. Love it!!!! xo Diana
ReplyDeleteHow clever! I never would've thought to do that. It looks amazing! I love the color you used on the new frame too.
ReplyDeleteThis is so cool, Lisa! Your hubby is very handy, a perfect fit. And I like your painting technique, the color looks fantastic. Love it!
ReplyDeleteXO,
Jane
That looks great, Lisa! It's so nice to be married to a "Handy Man," isn't it?
ReplyDeleteVery, very nice!
ReplyDeleteThanks, Luisa! I was worried about the painting process, but it turned out better than I expected. :)
DeleteOh, wow! What a transformation. Looks wonderful,
ReplyDeleteVery nice! Love the new look!
ReplyDeleteThank you, Kathy! I'm pretty happy with how it turned out. :)
Delete